A fairly common element across video games is a player or character that the user controls and moves around the environment. Let’s walk through setting up a player that can be moved up and down as well as left and right around the screen (think a top-down gaming experience).

To start, let’s write out the pseudocode for adding player movement. You’ll want to:
- Control how quickly the player moves using a speed value.
- Take input from the user to dictate how the player should move
- Use that input to dictate the direction in which the player should move
- Move the player to a new position based on the direction and speed
Set the speed

The speed is just a value that we’ll use to control the magnitude of how quickly the player will move in a direction. To set the speed, create a variable to store the value. A float value will grant more control over the speed, allowing incremental changes between the integer values. Since we have no need at this time for another part of the program to access or change the speed, let’s make this a private variable. To be able to adjust the player speed in the Unity Editor, add the SerializeField attribute above the variable.
Detect user input
Detecting user input can seem a little daunting, as we would need to know exactly how the user will interact with the game. Even if you are strictly building for computer deployment, you may need to account for the user’s preference between the WASD keys and the arrow keys.

Luckily, Unity contains an Input Manager that provides a solution for this. To view the Input Manager, go to Edit > Project Settings, then select Input Manager from the navigation bar.

Unity collects common inputs under different Axes via the Input Manager. To move side-to-side, you can make use of the Horizontal axis. Like on a typical graph, the Horizontal axis increases to the right and decreases to the left. In the Input Manager, you can see there are two buttons mapped to a Negative value (left as in left arrow and the A key) and two buttons mapped to a Positive value (the right arrow and the D key).

Similarly, the Vertical axis maps input from the W and S keys as well as the Up and Down arrows.
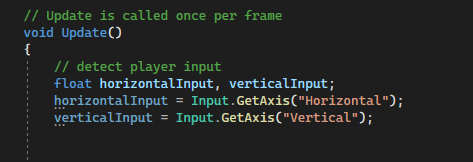
To access these values in code, we can call the Input.GetAxis method, providing the name of the Axis via a string literal. Since the user inputs will change as the game runs, let’s grab and store these values in the Update method.
Update the player’s direction
First, we’ll need a variable to represent the player’s direction. Direction is just the path or vector the player is moving in, so we’ll create a Vector3 to store that path in code. When creating a Vector3, you need to create a new instance of the object and pass in the required parameters for the constructor, which, in this case, are the X, Y and Z values. We’ll map the horizontal input to X, the vertical input to Y, and pass a zero for the Z, as this player is only moving in 2 dimensions.
Move the player
Now, with all the groundwork in place, it’s time to actually move the player. In Unity, you can move a game object with the Transform.Translate method by passing in a Vector3. Since our direction is a Vector3, let’s pass that in.
If we go back to Unity and run this code, we’ll see there are few adjustments to make. For one, the player moved off the screen almost instantly, which is not the desired outcome. Secondly, we never incorporated the speed variable we set at the beginning.
To address the disappearing player, we need to adjust for time. The Update method runs once per frame, which could be around 60 times per second. To have our player move in reference to real time, we can incorporate Time.deltaTime into our Translate method. Time.deltaTime is a variable in Unity that stores the time in seconds between frames. Luckily, Vector3 values like the direction can be modified via multiplication due to the distributive property. To adjust for time, you can multiply the direction by Time.deltaTime. Since Time.deltaTime is a fraction of a second, it will reduce each axis value in your Vector3 by that fraction. Similarly, to incorporate speed, we can multiply by the speed as well, increasing each axis value by that amount.
If we return to Unity, the player now moves as desired.